Hibiscus Flower Drawing Easy Method LEAKED! The Nude Truth About Simple Sketches Will Shock You
Have you ever wondered why some people can draw beautiful flowers effortlessly while others struggle to create even a basic sketch? What if I told you there's a simple method to draw a stunning hibiscus flower that's been kept secret by professional artists? The truth about easy flower drawing might shock you – it's not about talent, but about understanding the right techniques and practicing with the proper guidance. This comprehensive guide will reveal the leaked method that makes hibiscus flower drawing accessible to everyone, from complete beginners to those looking to refine their skills.
Understanding the Basics of Hibiscus Flower Drawing
Drawing flowers, especially the exotic and vibrant hibiscus, can seem intimidating at first glance. However, the foundation of any great drawing lies in understanding the basic structure and breaking down complex shapes into simpler components. When you approach a hibiscus flower, you're not just looking at a beautiful bloom – you're seeing a collection of geometric shapes, curves, and patterns that work together harmoniously.
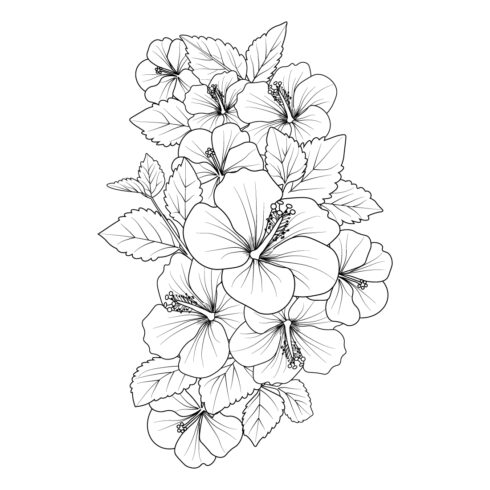
The hibiscus flower is characterized by its large, showy petals that often appear in vibrant colors like red, pink, yellow, or white. These flowers typically have five petals arranged in a circular pattern around a prominent central stamen. Understanding this basic structure is crucial because it provides the framework upon which you'll build your drawing. Think of it as creating a skeleton before adding the flesh – the basic structure guides everything that follows.
- Whats On Epsteins List Leaked Names Nude Photos And Disturbing Sex Secrets Uncovered
- Explosive Paris Hiltons Dark Link To Epsteins Trafficking Ring Revealed
Before diving into the actual drawing process, it's important to gather your materials. You'll need a sketchpad or drawing paper, a range of pencils (HB for light sketching, 2B or 4B for darker lines), an eraser, and optionally, colored pencils or markers if you want to add color to your finished piece. Having the right tools makes the process smoother and more enjoyable, allowing you to focus on developing your skills rather than struggling with inadequate materials.
Getting Started: Essential Materials and Preparation
To begin your flower drawing journey, all you truly need is a simple sketchpad and pencil. This minimalist approach is actually beneficial for beginners because it removes the pressure of using expensive or specialized materials. A standard graphite pencil and regular paper are perfect for learning the fundamentals of hibiscus flower drawing.
When selecting your pencil, consider having a few different grades available. An HB pencil is excellent for initial sketching because it produces light lines that are easy to erase and modify. As you progress and need to add depth or darken certain areas, a 2B or 4B pencil will serve you well. These softer leads create richer, darker lines that can help emphasize certain features of your flower drawing.
- Cute Dream Date Exposed How He Knew Every Detail The Shocking Leak You Must See
- The Shocking Truth About Egg Rolls Vs Spring Rolls That Will Change Everything
Your sketchpad should be of decent quality – not the cheapest available, but not necessarily professional-grade either. Look for paper that can handle some erasing without tearing and has a smooth surface that allows your pencil to glide easily. Many artists find that a medium-weight paper (around 70-90 lb) works perfectly for pencil drawings. Remember, the goal at this stage is to practice and improve, so don't worry about investing in expensive materials until you've developed your skills and confirmed your interest in continuing with flower drawing.
Step-by-Step Guide to Drawing a Hibiscus Flower
This simple lesson will show you, in an easy yet detailed manner, how to draw a hibiscus the way real professional artists do. The key to success is following a systematic approach that builds upon each previous step, gradually transforming simple shapes into a realistic flower representation.
Step 1: Creating the Basic Framework
This is the first step of our guide on how to draw a hibiscus, and we will start by drawing two petals for the flower. Begin by lightly sketching a small circle in the center of your paper – this will serve as the guide for the flower's core. From this central point, draw two large, curved petal shapes that extend outward. These initial petals should be drawn with very light pressure on your pencil, as they're just guidelines that will be refined later.
The beauty of starting with just two petals is that it establishes the basic orientation and spacing for your flower. Hibiscus petals typically have a slightly irregular, organic shape rather than perfect symmetry. Pay attention to the curves and how they flow from the center outward. Each petal should have a gentle wave or curve, mimicking the natural way flower petals grow and unfurl.
Step 2: Adding the Remaining Petals
Once you have your first two petals in place, continue adding the remaining three petals around the center. Remember that hibiscus flowers typically have five petals total, so you're aiming to complete the circular arrangement. Each new petal should connect smoothly to the center circle and flow naturally from the ones already drawn. Don't worry if they're not perfectly identical – in nature, flowers have subtle variations that make them unique and interesting.
As you add each petal, observe how they overlap slightly where they meet. This overlapping creates depth and makes your drawing appear more three-dimensional. The petals should radiate outward from the center like the spokes of a wheel, but with gentle curves rather than straight lines. Take your time with this step, as getting the basic petal arrangement correct will make the rest of the drawing process much easier.
Step 3: Detailing the Center and Stamens
At the center of the flower, there will be lots of solid black with the lines of the petals extending out into the petal. The hibiscus center is one of its most distinctive features, typically featuring a prominent stamen with multiple filaments extending outward. Begin by darkening the very center of your flower with solid black or very dark shading. This represents the pistil and the base of the stamens.
From this darkened center, draw several long, thin lines extending outward toward the base of each petal. These represent the filaments of the stamen. At the end of each filament, you can add a small dot or oval to represent the anther, where pollen is produced. The number of stamens can vary, but including 5-7 gives a realistic appearance. These central details add significant character to your hibiscus drawing and help distinguish it from other flower types.
Advanced Techniques for Realistic Hibiscus Drawings
Learning how to draw a great looking hibiscus with easy drawing instructions and video tutorial resources can elevate your artwork from basic sketches to professional-quality illustrations. The difference between a simple drawing and a realistic one often lies in the details and the techniques used to create depth, texture, and dimension.
Creating Depth and Dimension
One of the most important aspects of making your hibiscus flower look realistic is creating the illusion of depth. This is achieved through careful shading and understanding how light interacts with the flower's surface. Observe how the petals curve and fold – areas that curve away from the light source should be shaded darker, while areas facing the light should remain lighter or even highlighted.
Start by identifying your light source direction. Let's assume the light is coming from the top right of your drawing. This means the left sides of your petals and the undersides of curves will be in shadow. Use your softer pencils (2B or 4B) to gradually build up these shadow areas with smooth, even strokes. Blend the shading gently with your finger or a blending stump to create smooth transitions between light and dark areas.
Adding Texture and Detail
Hibiscus petals have a distinctive texture that can be suggested through careful line work and shading techniques. The petals often have subtle veining and may appear slightly crinkled or folded at the edges. To create this effect, use very light, curved lines that follow the natural growth patterns of the petals. These lines should be subtle – they're meant to suggest texture rather than dominate the drawing.
The edges of hibiscus petals often have a slightly ruffled or wavy appearance. You can suggest this by adding very gentle, irregular lines along the petal edges rather than drawing them as perfectly smooth curves. This small detail adds a significant amount of realism to your drawing and helps capture the natural, organic quality of the flower.
Video Tutorial and Visual Learning
In today's flower drawing tutorial, I'll show you how to draw a simple yet realistic hibiscus flower using both step-by-step instructions and video demonstrations. Visual learning can be incredibly effective for art techniques, as it allows you to see exactly how strokes are made and how different elements come together.
Many successful artists recommend combining written instructions with video tutorials, as this provides multiple ways to understand and absorb the techniques being taught. When you watch a video demonstration, pay attention to the artist's hand movements, the pressure they apply to their pencils, and how they build up layers of shading gradually. These subtle details are often difficult to convey through text alone but are crucial for developing your own drawing skills.
Video tutorials also allow you to pause, rewind, and rewatch sections as needed, which is particularly helpful when learning new techniques. You can practice each step at your own pace, ensuring you understand it fully before moving on to the next. This self-paced learning approach is especially beneficial for beginners who may need more time to develop their coordination and confidence with drawing tools.
Practice Exercises and Worksheets
Learn the basic skills of drawing hibiscus flowers with this step-by-step worksheet made for beginners. Structured practice exercises are essential for developing your drawing abilities because they provide focused opportunities to work on specific skills without the pressure of creating a complete finished piece.
A good practice worksheet might include exercises like drawing various petal shapes, practicing different types of shading techniques, or working on creating smooth curves and lines. These focused exercises help build muscle memory and improve your control over your drawing tools. As you complete these exercises repeatedly, you'll notice your lines becoming more confident and your shapes more accurate.
Consider creating your own practice sheets by drawing grid patterns and practicing drawing curves and lines within those grids. This helps develop your sense of proportion and spacing. You can also practice drawing individual hibiscus petals from different angles, which helps you understand the flower's three-dimensional structure better. The more you practice these fundamental elements, the more natural and effortless your complete flower drawings will become.
Common Mistakes and How to Avoid Them
When learning how to draw flowers for beginners, it's important to be aware of common mistakes that can hinder your progress. Understanding these pitfalls beforehand can save you time and frustration as you develop your skills.
One frequent mistake is pressing too hard with your pencil in the early stages of drawing. This makes it difficult to make corrections and can result in harsh, dark lines that are hard to work with. Instead, use light, gentle strokes when sketching the basic shapes, and only apply more pressure when you're confident about the final lines you want to keep.
Another common error is creating petals that are too symmetrical or uniform. While it might seem logical to make all petals identical, real flowers have natural variations that make them interesting and beautiful. Don't be afraid to make your petals slightly different in size, shape, or curve. These subtle variations add character and realism to your drawings.
Many beginners also struggle with proportions, either making the center of the flower too large or too small relative to the petals. A helpful trick is to use your pencil as a measuring tool – hold it up against your reference image (or your own flower if you're working from life) to compare sizes and proportions before transferring them to your drawing.
Taking Your Skills to the Next Level
Take your flower doodles to the next level with this detailed hibiscus flower tutorial that goes beyond basic drawing techniques. Once you've mastered the fundamentals, there are numerous ways to enhance your artwork and develop a more sophisticated style.
Consider experimenting with different mediums beyond graphite pencils. Colored pencils can add vibrant life to your hibiscus drawings, while watercolors can create beautiful, flowing effects that capture the delicate nature of flower petals. Each medium has its own unique characteristics and challenges, and exploring different options can help you discover new ways to express your artistic vision.
You might also want to try drawing hibiscus flowers from different perspectives – not just the classic straight-on view, but also from the side, from above, or at various angles. This helps you understand the flower's three-dimensional structure better and adds variety to your artwork. Drawing from different angles also prepares you for more complex compositions where multiple flowers might be arranged in interesting ways.
Specialized Techniques and Tips
Learn how to draw a pretty hibiscus flower easy, step by step drawing lesson tutorial with specialized techniques that professional artists use to create stunning floral artwork. These advanced tips can help you achieve results that look polished and professional.
One effective technique is the use of negative space – instead of focusing only on drawing the petals themselves, pay attention to the spaces between them. Sometimes, accurately rendering these negative spaces can help you achieve more accurate overall shapes. This approach can be particularly helpful when dealing with complex overlapping areas where petals intersect.
Another valuable tip is to study real hibiscus flowers or high-quality photographs before you begin drawing. Pay attention to how the light hits the petals, where the shadows fall, and how the colors transition from one area to another. Even if you're creating a black-and-white drawing, understanding these color relationships helps you create more convincing shading and form.
Creating a Complete Drawing Practice Routine
• How to draw an open rose easy #stayhome and draw demonstrates the importance of establishing a consistent practice routine. Regular practice is essential for improving your drawing skills, but it's equally important to practice effectively rather than just putting in hours without direction.
Create a practice schedule that includes a variety of exercises – some days focus on basic shapes and proportions, other days work on shading techniques, and some sessions can be dedicated to completing full flower drawings. This varied approach helps you develop all aspects of your drawing skills systematically rather than focusing too heavily on one area while neglecting others.
Set realistic goals for each practice session. Instead of aiming to create a perfect drawing every time, focus on improving one specific aspect – perhaps today you'll work on making your petal curves more natural, or tomorrow you'll practice creating smoother shading transitions. These small, focused improvements add up over time to create significant overall progress.
Conclusion: Your Journey to Mastering Hibiscus Flower Drawing
Drawing a beautiful hibiscus flower is an achievable goal for anyone willing to learn and practice the right techniques. The leaked method revealed in this guide shows that creating stunning floral artwork isn't about having mysterious talent – it's about understanding basic principles, practicing consistently, and being willing to learn from both successes and mistakes.
Remember that every artist, no matter how skilled they become, started exactly where you are now. The key difference between those who improve and those who don't is persistence and the willingness to keep practicing even when results don't immediately match expectations. Your first hibiscus drawings might not look exactly like the ones in professional tutorials, but with each attempt, you'll notice improvements in your technique, confidence, and artistic vision.
The journey of learning to draw flowers, particularly the beautiful and exotic hibiscus, is rewarding not just for the artwork you create but for the skills you develop along the way. These skills – observation, patience, attention to detail, and creative problem-solving – extend far beyond drawing and can enrich many areas of your life. So grab your sketchpad, sharpen your pencils, and begin your hibiscus drawing adventure. The simple method is now in your hands, and the beautiful flowers you'll create are limited only by your imagination and dedication to practice.
- What This Golden Retriever Chose For His Birthday Will Shock You
- Shocking Epstein Cell Images Leaked The Dark Truth About His Final Days

Easy Hibiscus Flower Sketch. Botanical Hibiscus Flower Drawing

Pin by AMELLE COMMUNICATION on Hibiscus | Flower art drawing, Easy
vector hibiscus flower. hibiscus flower drawing easy, sketch easy

